In today’s Photoshop tutorial, you will learn how to integrate a female model in a dark environment and apply abstract lights effects over the scene. Abstract effect can be applied widely for main object or background, as long as the abstract effect can match with your artwork’s theme. You’ll learn how to use different textures, brushes as well as adjust colors to make an interesting abstract piece . Basically we’re going to create some nice sparkly effects and connect them with a certain model, mixing up everything with a nice suitable background. Once you are familiar with the techniques, you can create your own artworks simply.
TUTORIAL DETAILS
- Program: Adobe Photoshop
- Difficulty: Beginner
- Estimated Completion Time: 3 Hours

Tutorial Resources
Step 1
Open image of the model. Double-click with left mouse button on it to unlock the Background layer. Duplicate it using Ctrl+J, then hit Ctrl+L (Levels) over the duplicated layer. Set it as shown in the second image below. You can go even little bit further with the darkening.

Step 2
Now select Brush Tool (B), hit D on keyboard to bring colors to default and set your foreground brush color to black. Make sure all your brush options are set to 100% and then paint in the same layer, over the light spots to fill them up with black.

Step 3
Now go to Select > Color Range and use the same settings as shown below. Press OK and then go to Layers Palette and turn off the visibility of the duplicated layer. Your screen should now look exactly like the second image below.

Step 4
Select “model” layer and click on the Layer Mask button. Now you can just delete the “model copy” layer, as we won’t be using it anymore. We needed it only for extraction.
So this was an alternative way for some cutting out, usually people use Channels to do this. But isn’t this fun to learn something different?

Step 5
Let’s don’t get so excited, as this is only the first stage of the extraction, now we’re going to need to blend this model with a desired background. So create a new layer below the “model”, grab Paint Bucket (G) and fill it with black color. As you see there are still some white edges. The cut out never works perfectly, so you either have to blend it properly or just do some more accurate extraction.

Step 6
Now let’s go to Layers Palette, right-click on the “model” layer mask and select Apply Layer Mask. Next hold Ctrl and left-click on the “model” layer thumbnail, this should bring up the selection.

Step 7
Select the “model” layer and hit Ctrl+Alt+R (Refine Edge). Use the same or similar settings as mine. You should see on the live preview on image how it’s working. When your done apply it by hitting OK.
Output will create another layer with the settings below applied, so you can just basically delete or just turn off the previous layer. It’s up to you.

Step 8
We still have some white edges left, especially over hair and clothes that she holds. Basically, at that point I decided to cut some hair totally and don’t play around with further extraction. We want to create some cool light effects over the model, not to do a full and elegant retouch after all. I’ve indicated spots that you might find useful to get rid of. But before you start some erasing, move onto the next step.

Step 9
Grab Brush Tool (B), set it all the way to 100%, but decrease the Spacing to 1% and check the Smoothing option. Again use black color for painting and go to Layer Mask of the “model” layer. Now paint over the Layer Mask, in indicated spots, referring to step 8.
You should handle this easily by mouse, 1% spacing let’s you to give a very accurate erasing. When something goes wrong you can always undo the masking by painting with white on mask.

Step 10
You should achieve similar results to mine if you painted accurately. Now pay attention to the red line surrounding the model. It’s indicating how we’re going to shade her to make her body and clothes blend with the background better. So go to Layers Palette, create new layer above “model” and hit Ctrl+Alt+G, this will create a Clipping Mask (and it should look like you see in the preview below).

Step 11
Set your brush options as shown below and reduce the Flow option of brush to 5%. Next, pick #572e16 color and paint on the “shading” layer as indicated in previous step. Do it along the suggested red line and trust your own taste of where to add more and where less.

Step 12
Great! Look at the comparison, the light edges completely disappeared now.

Step 13
Now go to Layers Palette, make sure you’re on the “shading” layer (the last one created as Clipping Mask). Add Curves adjustment layer on the top, select it and hit Ctrl+Alt+G (Clipping Mask). Then grab Paint Bucket (G), pick black color and fill Curves layer mask with black (1st image below).
Next, as indicated in the second image below, grab soft brush (with the same settings as in step 11). Then use white color and paint over the layer mask as indicated with green color. The basic idea is to enhance the shadows and blend the character more to the background.
The next images show you how your layer mask should look after painting and the result of painting over Curves adjustment layer mask.

Step 14
Now create another new layer above Curves, use Clipping Mask as previously. Change its Blending Mode to Multiply. Next grab Brush Tool (B) with the same settings as in step 11, and paint using #dac5b5 color in spots indicated below. Do not pay attention on the selection, I just used it to show you where to enhance the shadows, you don’t need to create that.

Step 15
OK, now same here. Create another new layer above and use Clipping Mask again (Ctrl+Alt+G). Change its Blending Mode to Soft Light this time and pick #f7e1cf for color. Use the same brush settings as previously and paint in spots indicated with green below. The second image below is result of a proper painting.

Step 16
Next, go to the very bottom of Layers Palette and create new layer above the black background layer. Grab Brush Tool(B) with the same soft settings as previously (step 11). Use #301a10 color and paint a little bit in the center of the image.

Step 17
Repeat the same process on new layer and this time paint with #774322. Make sure you’re spreading this background light wider.

Step 18
Repeat the same process again, now with #d8a883 color. You should get something similar to what you can see below. In the second image below is a fast preview of the Layers Palette.

Step 19
OK, now let’s create some more environment and blend the model more. To do that you’re going to need to adjust your brush settings as you see below. It was the most efficient one for me, play with those settings if you won’t be satisfied with your results.

Step 20
Moving further, go to the top of Layers Palette and create a new layer above all. I assume you already have your Brush Tool (B) selected, so now just pick #180d07 color and simply use mouse to paint as indicated with red arrows.

Step 21
Create new layer above, change it’s Blending Mode to Multiply and repeat step 20. Paint over the same spots and make the blending/shading even stronger.

Step 22
Again go above all the layers in Layer Palette and create new adjustment layer – Gradient Map, on the very top. Choose one of the original presets – Violet, Orange and lower its Opacity to around 35%.

Step 23
Next, create another Gradient Map above, change the gradient as shown below and this time set its Blending Mode to Soft Light and lower its Opacity to around 40-50%.

Step 24
Now, switch back to the previous brush settings from step 11. Grab Brush Tool(B). Pick white color. Then create new layer above all layers, change it’s Blending Mode to Soft Light and softly enhance her body and clothing as shown below (green light indicates where to paint). This should help her stand out more from the dark environment.

Step 25
Open the image of red chiffon and place it above all layers. By the way you can rotate it (Ctrl+T) to create a good flow position.

Step 26
Next, change its Blending Mode to Hard Light.

Step 27
Hit Ctrl+U (Hue/Saturation) and apply following settings to this chiffon layer.

Step 28
Now as you can see it look almost transparent, so add a Layer Mask to the chiffon layer grab Brush Tool (B), pick black color and erase all the visible black image edges, as well as some of the chiffon.

Step 29
Repeat previous step as many times as you need and create a nice connected “smoke” effect, by mixing those chiffons.

Step 30
Next, open one of the fire images. Grab Lasso Tool (L) and create a rough selection as you see below. Hit Ctrl+C to copy.

Step 31
Paste it above the chiffon layers and change its Blending Mode to Screen.

Step 32
Create a Layer Mask and paint on it with hard black brush to get rid of the visible edges.
Hint: never use a very soft brush while erasing fire, it will lose the sparkle.

Step 33
Use as much fire stocks as you want, the better variation, the better result. Make some erasing in each one and try to achieve a certain shape. The best way is just to follow the smoke.

Step 34
So this is how it looks after proper erasing, it’s kind of time-consuming process, but if you do this patiently, you will achieve great results. When you’re done, select all those fire layers (simply hold Ctrl and click on their names in Layers Palette, one by one until you select them all). Merge them using Ctrl+E and change the Blending Mode again to Screen.

Step 35
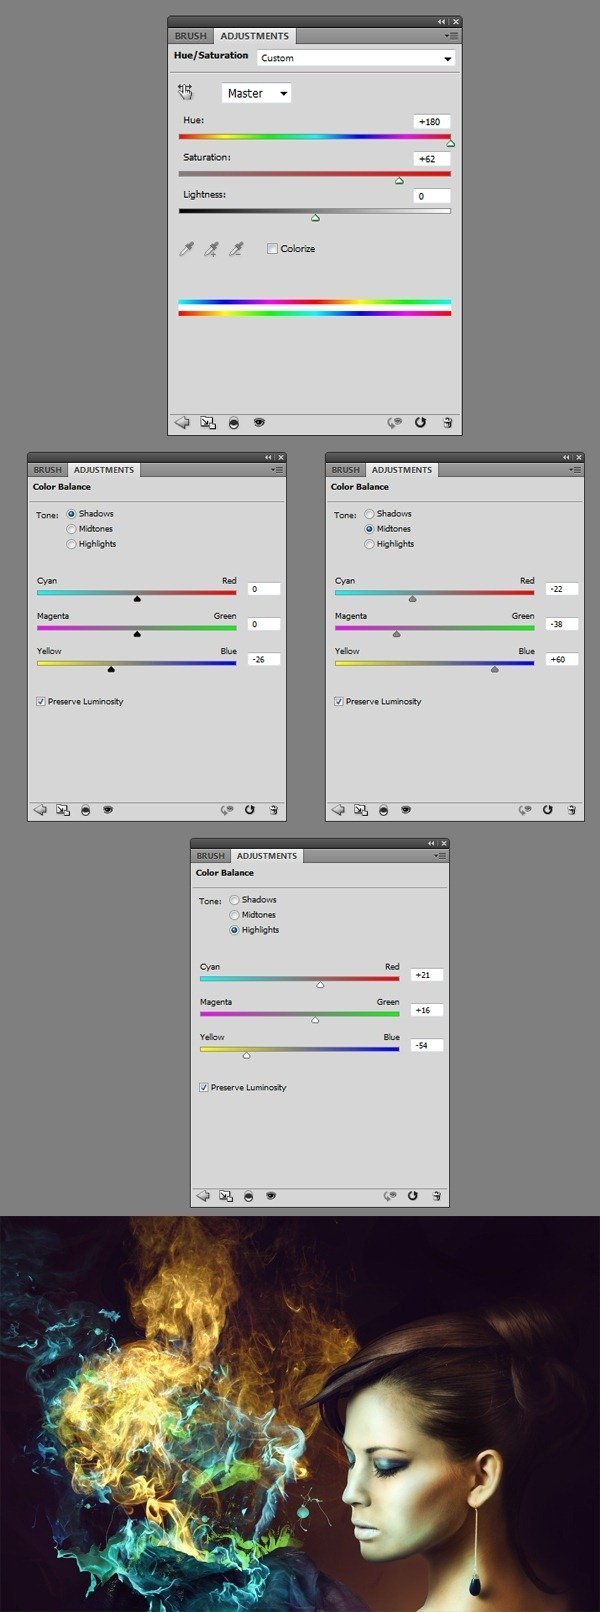
Now that we have the fire effect under one layer, let’s apply a set of effects over it to make the fire look more like an abstract light. So go to Layers Palette and add Hue/Saturation and Brightness/Contrast adjustment layers, then select both and hit Ctrl+Alt+G for Clipping Mask.

Step 36
Move further and apply now Color Balance adjustment layer (use Clipping Mask).

Step 37
Finally, use the same way for the last adjustment layer – Levels. Remember that you can always adjust your adjustment layers, for instance – lower the opacities, or paint on their masks if you feel that the effects are too strong. When you’re done adding adjustment layers, the image should look similar to the second one below.

Step 38
Next, go to the Layers Palette again, hold Ctrl and left-click on the model layer’s thumbnail. This should bring up her selection ad you see in the 1st image below. Then create new group right below the fire layer and while having the selection active click on the Add Layer Mask button.

Step 39
Now when you add anything to this group, it will only affect the silhouette our woman. So first of all, create a new layer in this group and change its Blending Mode to Linear Burn, change the Opacity to max. 30% and paint with soft brush (use #8be7ff color). This will add a very slight blue colorization.

Step 40
Now add another adjustment layer to this group – Color Balance. Use settings from below. Then grab Paint Bucket Tool(G), pick black color and fill its Layer Mask.

Step 41
Now, grab Brush Tool (B), make it very soft, change the color to white and start revealing the layer mask. Use the arrow indicators from step 39 as a reference for painting. Basically, we’re causing a blue fire reflection over her skin.

Step 42
Next, again add another adjustment layer in this group – Curves. Adjust it as shown, separately for every channel (Red, Green and Blue – all 3 are in the same position). Then refer to step 40, fill the Layer Mask with black again and now using white brush (while painting on mask) add some shadows as indicated.

Step 43
Continue adjusting the character. Everything goes about the light, we need to create an impression that the blue fire is really there, that’s why she needs some more blue tones over front of her body. So now add in this group another adjustment layer – Gradient Map, set it as shown below.

Step 44
Go with another adjustment layer in that group, this time Black & White. Set it as shown below.
Here is a small issue, this adjustment (if set to soft light or overlay) causes a huge contrast differences, even though it’s decreased to 69% opacity, it still makes the edges of the model look pretty bad. So go to Black &White layer mask, grab black brush and get rid of the dark edge (2nd image below).

Step 45
Looking great! As final adjustment, create normal layer within that group, change its Blending Mode to Overlay, grab Brush Tool (B) again, use soft brush settings and paint with #8be7ff color, as indicated below.

Step 46
Now create another group above the “woman adjustment” group, name it “background splashes”. Hit Ctrl and left-click on woman layer’s thumbnail to bring up her selection, then hit Ctrl+Shift+I to inverse selection and while having the group still selected click on Layer Mask icon.
If you’re lost, refer to step 38. It’s the same process of adding the mask, with the difference of using Selection Inverse.

Step 47
Now after you add something to the “background splashes” group it will only affect the background without touching the model. So with that being said open the stain image and whatever way you will choose to extract it, it will be fine. It can be rough and inaccurate, the importance is to get rid od the surrounding white color. When you’re done, just paste it in that group.

Step 48
Hit Ctrl+I to Invert and change its Blending Mode to Screen. Use Ctrl+T to resize the stain. Place it somewhere among the smoke.

Step 49
Next apply few adjustment layers to this stain, in the exact order as you see below. You can either use Clipping Masks or just go to Image > Adjustments and pick Levels, then Hue/Saturation, then Color Balance, and apply those settings.

Step 50
When you applied everything correctly, you should receive the same result as in the 1st image below. There was no erasing done, those adjustments worked perfectly – they not only changed the color but also did a nice separation. To make this effect even more massive, duplicate this stain few times, use some rotations and place it along the smoke.

Step 51
Now, open image of splash, place it in the “background group”. Use Ctrl+T to free transform it, and place it somewhere in the smoke. Change its Blending Mode to Screen.

Step 52
Hit Ctrl+I to Invert the colors, then if you’re bothered with some parts of the splash, just erase it with Eraser Tool or using Layer Mask.

Step 53
Drag another splash to the group. Change its Blending Mode to Color Dodge.

Step 54
Again hit Ctrl+I to invert colors and you will immediately get some nice sparkly effects. As usual you can edit it by erasing some unwanted parts. Keep adding those various splashes as many times as you feel to make the effect more full.

Step 55
Now, add another splash to this group, this time keep it big. Change its Blending Mode to Color Dodge.

Step 56
Go to Image > Adjustments > Brightness/Contrast, and then Image > Adjustments > Hue/Saturation. Apply following setting to the splash. You should receive similar result as in 3rd image below.

Step 57
Try to blend this splash more to the background, you can either erase it using Eraser Tool or a Layer Mask.

Step 58
Next, open the image of smoke. Place it in the “background group” as well and change its Blending Mode to Screen.

Step 59
Then apply few adjustment layers to the smoke layer – Hue/Saturation, use Clipping Mask (Ctrl+Alt+G), and then Color Balance (use Clipping Mask again). Type the same settings as mine and you should achieve similar golden smoke result as below.

Step 60
Now add Layer Mask to the smoke and refer to the brush settings from step 19. Use same ones, vary your brush size and using black color, paint on mask to get rid of the unwanted smoke parts.

Step 61
Now leave the “background splashes” group, create new layer above all layers. Grab Ellipse Tool, pick a bright green color and while holding Shift draw a circle.

Step 62
Now go to Layers Palette, grab Paint Bucket Tool (G) with color picker set to black and fill the Shape Layer’s layer mask with black. Then grab Brush Tool (B), switch to white color. Set your brush to very, very soft settings (Hardness 0%, Flow 5%), go to Layers Palette and left click on the Vector mask thumbnail, this should spot your circle shape over the image.
Then, when you find it, just paint as indicated below to reveal a little bit of the green color.

Step 63
Repeat the previous step as many times as you want and use different colors for the circles. I won’t give you colors to paint those circles, as it won’t make sense. You’re able to change them whenever you want, since they are shape layers. So you just need to experiment here which color works the best in your case. On different backgrounds, different colors will work better. So don’t use bright colors only, vary them!

Step 64
Next go above all layers and create new layer. Use Paint Bucket and fill it with black color. Hit D on keyboard to set colors to default. Then go to Filter > Noise > Add Noise and depending on the size of your document use proper amount of noise. Then change the layer’s Blending Mode to Screen.

Step 65
Finally, while you’re still in Layers Palette above the noise layer, add a new adjustment layer – Hue/Saturation (Hit Ctrl+Alt+G for Clipping Mask) and use my settings from below.
Then add another adjustment layer – Gradient Map, and use settings shown below (this time no Clipping Mask, as it’s an overall adjustment)

Step 66
As for the final touch, right-click on the document name, pick Duplicate Image. Then name it as you want, and check Duplicate Merged Layers Only. This will copy the whole document to the new canvas. Then it would be best for you just to downsize the new document and go to Filter > Sharpen > Unsharp Mask.


Final Result


