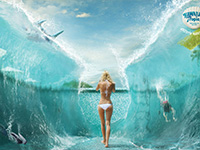
In this Photoshop tutorial we’ll be walking through the process of creating a human aquarium illustration using some awesome techniques.
Tutorial Details
- Estimated Completion Time: 2 hours
- Difficulty: Advanced
- Program: Adobe Photoshop

Choosing the stock
We'll use only the curves of the body and not the clothes. You must find a picture of a nude or lightly dressed person. I chose a picture of a woman with closed eyes laying in a calm/serene position. First step (that shouldn't be overlooked) is to trim down the character that figures on the picture. Easy to do with the pen tool under Photoshop. Then, you have to save the trace to use it later on.

Creating the glass effect
To create a character with a glass effect, it is best to find specific royalty free images of pieces of glass, bottles, light bulbs, aquarium... To save you time during the trimming process. Try to download images with a white background. Create a new blank layer and paste another one above the outlined model, reduce the opacity of your layer while keeping the outlines visible. This will serve as a frame to place the glass over.

Here we go!
I found an image of a light bulb with a white background that I'll use to trace the contours of the body. To work this out, you must find the best piece of glass.

Distortion effect
We'll use this piece of glass to transform it with the free transform tool. To do this, we simply need to adjust the size of the piece of glass with the selected part, and shift to free transform mode to fit the contour of the glass with the curve of the
model. Don't do a lot with a single piece.

Layer mask
To blend all pieces together we’ll need a layer mask and you’ll be able to join a line with a curve then another line etc. In a 3 part process. If the shape of the object doesn't match with the contour, delete the unnecessary elements with the layer and take a new piece of glass to finish the contour.

Carving
Sometimes you'll need to rework some pieces to follow closely the contours of a shape. You can do this with the free transform tool and carve the contours to obtain a realistic effect. Remember to store your layers in easy-to-remember folders.

Carving again!
You have to repeate the same process as above for smaller parts by reducing them to perfectly stick to the fingers and ears of the model.

Face
Use the black brush with a selection to create the eyelashes and eyelids.

Finishing with the body aspects
Disable the layer on the model to see if your outline is properly done, and eventually correct assembly and merging errors. You can see that all internal parts of the body (armpit, neck and shoulder) have been worked similarly but with
layers of reduced opacity compared to the contours.

Water
Get the selection trace of your character, and paint a new layer with a transparent blue color to give an aquarium effect. With a white fine brush draw the surface of the water, do not paint too close to the glass if you wish to get the thickness of the glass. You can also darken slightly the surface of the water to give the impression of a wave motion.

Water drops
To achieve condensation effect in the aquarium, use royalty free images of water drops on a window or take your camera and spray water on a glass. Give a 75% floodlight effect on the water drop layers.

Add vegetation
You'll need as much images of flowers/plants as you can to fill the aquarium. Create a folder under the glass and water files to simulate transparency. Flowers we'll be in the glass and feet in water. If the edges of the glass hide some of your flowers, create a layer mask on the folder and paint inside it to reveal flowers.

Fill your aquarium
Continue to place your flowers to fill your aquarium, while keeping in mind to vary shapes and colors. Make flowers overflow slightly with the free transform tool and reshape them to give a plastered effect against the glass.

Vegetation shadows
Select a layer of flowers and add a drop shadow effect. Right click on the layer effects that we've made previously and copy them, then select all the layers of flowers and right click to paste to the effects on all layers at once. You'll just have to modify a specific layer if necessary. I also added 2 goldfish, to emphasize the aquarium illustration.

Background
I tried to make a simple but textured background that gives a transparency effect on the glass. You simply need to find a texture and place it on a layer below plants. You can also add a slight gradient to draw attention to the center of the
image.

Lights and shadows
You can add to your model other effects such as reduced opacity on shadows with a large brush. On another layer you can add some light.

Reflection
Take your light bulbs and glass pics and place the reflections on your character. You can also draw yourself the reflections by making a selection and painting them with a white brush.

Final step
Give the final touch by creating adjustment layers above all other layers. I added adjustment layers for contours, saturation, blue photo filter etc.

Conclusion
Well, that's about it! Hope you had fun working on this project and learned many things that will help you in the future!
